While there’s been somewhat of a lull in the activity out at Cob Haven, things have nevertheless been puttering along the last few months, so it seems like a good time to provide an update.
The main emphasis has been on installing a “rocket mass heater”. It’s the cob enthusiast’s version of an integrated wood heater and furniture dynamic duo. For a few decades, those interested in this somewhat enigmatic creation turned to Ianto Evans, the founder of Cob Cottage out in Oregon, and a more recent collaboration between Ianto and Laura Jackson. I went ahead and got the third edition of their book to prepare for this part of the project, which is a worthwhile read. Greg shortly thereafter passed on “The Rocket Mass Heater Builder’s Guide: Complete Step-by-Step Construction, Maintenance and Troubleshooting” by Erica and Ernie Weisner which was my inspiring evening reading for a week or two, and resulted in a more detailed plan and shopping list and some additional details and practical/expert advice on how to pull this invention off. I’ll spare you the many details, other than to say assembling the parts and tools is rather more involved than a trip to Lowes or Home Depot (although a few items did come from each). It also seems that building the RMH requires a decent dose of on-the-fly learning and improvisation.

First up was a couple barrels found on Craigslist. The barrels basically serve as the shell around the heater, which is made of fire brick. They need to be free of paint so the paint doesn’t off gas when the heater is fired; a non-trivial amount of head scratching and effort has been pursued in figuring out the best way to achieve this. As a result, I have less hair, shorter fingernails, and a new torch. Here they are after their first torching. To date, there have been three torchings and an hour or two of mechanical abrasion, and there is still a bit of paint to remove. So next up is engulfing the barrels in a bonfire.

This photo shows a mock up of the guts of the mass heater. The part of the fire brick in front is where small pieces of wood are fed and the tall part in the back is the “heat riser”. The pile of brick and pipe to the left is the beginning of what will be a bench that will provide much of the mass for storing the heat generated.

Here’s what it looks like a bit further along as the combustion unit is being set with clay slip.

A key part of the whole system is called the “manifold” which is the transition between the wood burning part and the mass heater/ furniture part. Here’s Greg working on the custom fabrication.

Eya took special interest in the lunch part of the day, but for the most part, saw it as an opportunity for a nice long nap in the sun.
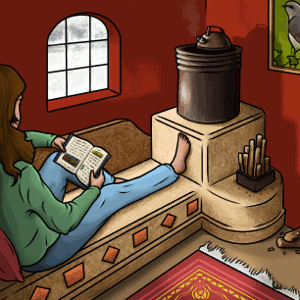
When all is said and done with the mass heater, it will look (and feel) something like this.

Randy, Greg, Matt, and Tain all pitched in this past weekend on to make this happen. Kudos to all for the many collaborative elements that came together, including good humor, flexibility, masonry and steel cutting expertise, and perseverance, dedication, and willpower.


